Try this at home!
|
| by Bryan Greer |
| Originally posted March 2003. |
Home
Telescope Thermodynamics
Sept. 2000 Sky & Telescope magazine companion web site
May & June 2004 Sky & Telescope magazine companion web site
Using fans with a Newtonian telescope
Tips on attaching a temperature probe to your telescope
Optical Miscellany
Try this at home!
How atmospheric seeing affects telescopes with different focal ratios
Animated focal plane illumination map
Properties of various mirror substrate materials
Adventures in collimation
Introduction
 The Internet community makes it possible to easily share the hobby of amateur astronomy with others. While this is clearly a net positive, one negative consequence is the speed at which partial truths and myth can propagate. Once enough people adopt a belief — whether it is accurate, partially accurate, or false — a critical mass is reached, and the idea becomes entrenched. When possible, it's best to simply test theories for yourself. With a little cleverness, many theories can be tested on your own telescope.
While many optical tests do require elaborate test setups, some of the best field tests are done with little or no special equipment. The most obvious example of this is the star test, which requires nothing more than a high-power eyepiece and some experience. Most of these simple tests are inherently revealing because the test is performed on the same telescope, thus making it possible to better isolate the test parameter of interest. It's often hard to construct a valid "A verses B" comparison using two different scopes since there are so many uncontrollable differences between them (e.g., optical quality, thermal condition, collimation, focal ratio, etc.).
In the end, all testing should be based on the principals of the scientific method. Skepticism is a good thing, and overconfidence in your judgment can lead to incorrect conclusions. (I say this from experience. My first hunches are as likely to be right as wrong!) Try to figure out if there are alternative explanations for what you are seeing, and try to make your testing "blind" where possible. This means that the observer isn't aware of when a test parameter is being changed which avoids unintentional bias in the results. This usually means you'll need a friend or spouse to help out with the test.
Examples of Simple Tests
How does the central obstruction in a Newtonian reflector affect the image quality?
It is easy to explore the impact that the central obstruction has on image quality. Have a friend hang some circular cardboard cutouts onto the center of your Newtonian's spider (or hold them in front with a thin wire). If your 10-inch telescope has a 1.83-inch secondary, try putting 2", 2.5", 3.0", and 5.0" obstructions in front of it. (Of course, the observer shouldn't be told what size is in place.) How much larger can the obstruction get before you notice a difference on planets, double stars, and lunar features? You can also do this sort of testing while examining the diffraction rings around the Airy disk of a bright star at very high power.
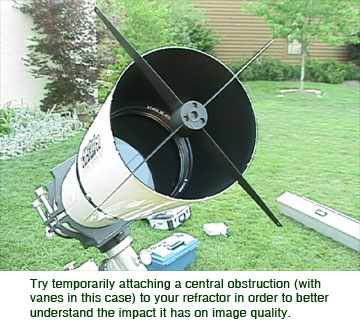
If you own a refractor telescope, you can compare central obstruction sizes all the way down to zero. In fact, it is more interesting to do this test with a refractor since it has no obstruction, and that is often given credit for its high image quality. How much will the image quality suffer if you hold a dummy central obstruction in front of it? What about holding some fake spider vanes in front of it? You might be surprised by what you discover.
How does the secondary spider shape and thickness affect the image?
There is sometimes debate as to just how important it is to keep a Newtonian's spider vanes thin. Go ahead and tape some cardboard shims onto your spider vanes and see for yourself. If you have a four-vane spider, attach shims just to two opposing vanes while leaving the other two unaltered. This way, you can directly compare the diffraction spike intensity in the same field of view. How much vane thickness difference does it take for you to notice a difference in the diffraction spike intensity? (Try a variety of magnifications, as the brightness of the spider diffraction varies with magnification.)
Similarly, you can experiment with a bent coat hanger or metal wire held in front of the scope to see how differently shaped curved supports produce different diffraction effects. What angle of bend is required to symmetrically spread the diffraction around bright objects?
How important is collimation?
We all know collimating your telescope is important, but what exactly happens to the image when it's not spot on? Try examining both stellar and planetary objects with your telescope collimated, and then in various degrees of miscollimation. With some calculation, it's possible to "calibrate" the collimation adjustment screws on your primary cell. Once determined, you can induce known amounts of error. For example, I know with my own 8" Newtonian that a one-half turn of the primary mirror collimation wing nut causes over one wave of error in the wavefront!
Does my mirror have a bad edge?
Even if you don't have a full understanding of the star test, it's easy to detect edge defects. Perform the star test with a cardboard aperture mask covering the outer portion of the primary (e.g., a 7-1/2" mask for a 8-inch reflector). If the extrafocal diffraction rings change in any qualitative way with the mask in place then an edge defect is present (usually a turned down edge). Hand-held video of the star test through the eyepiece can make careful comparison easier.
Return to Telescope Optics Topics.