Tips on attaching a temperature probe to your telescope |
| by Bryan Greer |
| Originally posted April 2004. Last updated May 5, 2008 |
Home
Telescope Thermodynamics
Sept. 2000 Sky & Telescope magazine companion web site
May & June 2004 Sky & Telescope magazine companion web site
Using fans with a Newtonian telescope
Tips on attaching a temperature probe to your telescope
Optical Miscellany
Try this at home!
How atmospheric seeing affects telescopes with different focal ratios
Animated focal plane illumination map
Properties of various mirror substrate materials
Adventures in collimation
Introduction
 Over the years, a surprising number of people have expressed an interest in monitoring the precise thermal condition of their telescope by using electronic thermometers (or "thermistors"). While such monitoring is usually temporary, some observers have made the temperature readout a permanent part of the scope! You will need to monitor two temperatures at the same time; the mirror's surface, and the ambient air.
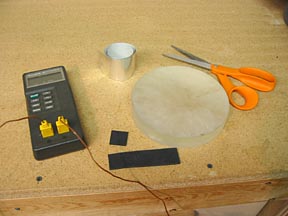
Laboratory-grade electronic thermometers have become affordable, but even an inexpensive indoor/outdoor thermometer can sometimes suffice provided that the probe is attached to the glass surface properly and in a consistent fashion. The attachment method should meet the following requirements:
1. Provide enough mechanical strength to keep the probe tip in contact with the glass surface as the scope is slewed about the sky,
2. Insulate the probe from the ambient air (otherwise, you'll be measuring a blended temperature of both glass and ambient air), and
3. Be quick and easy to apply — even in the dark.
While I'm sure there are many ways to get good results, the following method has worked well for me:
Attaching the Mirror Probe
|
|
|
|
|
|
|
|
|
|
 Step 1: Cut about six 1-inch squares out of aluminum tape, and then also cut about three 2-inch squares. Aluminum tape provides the strength needed for consistent probe tip contact, and is commonly found at the hardware store in 2-inch widths.
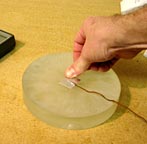 Step 2: Tape the thermometer probe tip to the mirror's surface using a 1-inch square piece of aluminum tape. Use your finger nail to press the tape firmly to the glass along the outline of the wire and probe tip.
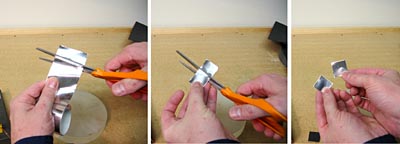
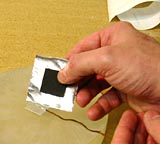 Step 3: Cut a 1-inch square piece of the insulating material. I use 1/8" thick neoprene foam sheeting from a local art supply store for the insulating material (similar to what computer mouse pads are made from), but most thin foam sheets would work. (Self-stick foot bunion pads also work well.) Apply it to the center of a 2-inch square piece of aluminum tape to make a patch as shown.
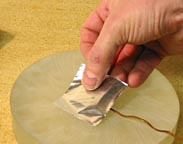 Step 4: Apply this tape patch over the first piece of tape. Try to center the foam insulation over the tip of the probe. Again, use your fingernail along the edges of the probe wire, and around the foam.
 Step 5: You're now ready to find out just how closely your telescope's mirror conforms to its surroundings. This connection will even survive a few dunks in hot water!
The Ambient Probe Location
You will also want to measure the temperature of the ambient air near the primary mirror, since it is the temperature difference between the mirror and air (or delta T) which is important. If you are unsure of the accuracy or calibration of your two probes, compare them at two widely spaced temperatures. A cup of gently stirred ice water will always be at exactly 32 ºF (0 ºC), so that makes for one good reference. Another easy check is simply room temperature. This will tell you if both probes are reading the same thing. Let both probes come to equilibrium with room temperature, and they should agree to within about 1/2 degree ºF (0.3 ºC). (Common digital thermometers easily meet this requirement.)
The location of the ambient probe does matter. I was surprised to discover that the ambient temperature can change a few degrees by just moving the probe from 6-inches off the ground to over your head. The best position for the ambient probe is somewhere near the primary mirror, but not near the fans. I usually tape the probe wire near the bottom of my telescope tube, but on the outside of the tube. The stiff metal probe wire permits it to be bent such that the probe tip is several inches away from the tube itself.
A Final Note About Accuracy
The accuracy of the glass surface temperature measurement can be improved by applying a small dab of conductive heat sink paste around the probe before applying the metal tape. Pastes are messy, and they are usually not needed unless your probe tip diameter is large. Some types of inexpensive temperature probe tips are too large, and they tend to "feel" more of the ambient air than the glass itself. A conductive paste might be required for these types of thermistor tips.
Return to Telescope Optics Topics.